Photography at its very heart is about capturing a moment in time. The exact moment you choose to capture an image is one of the most impactful decisions you can make. Tied into that decision of exactly when to press the shutter release is the choice of how long a moment to capture.
Shutter speed has a profound effect on the final image and is perhaps the most important camera setting of all.
Where the Term “Shutter Speed” Comes From
Shutter speed is the modern accepted name, but those are poorly chosen words to describe the procedure. The term “shutter speed” refers to the amount of time that the capture medium (film or digital sensor) is exposed to light.
In the early days of photography, before mechanical shutters, you could control the shutter speed by how long the lens cap was removed from the camera. A fast shutter speed simply meant that you were returning the lens cover to block the light in a short amount of time.
Shutter technology progressed with in-lens leaf shutters that could precisely control the amount of time light would be allowed to strike the film. Focal plane shutters, located in the camera body, allowed for smaller and more portable interchangeable lens camera systems.
The funny thing about shutter mechanisms is that, for the most part, the speed that the shutter blades move doesn’t really change all that much between slow and fast shutter speeds. The difference between a fast shutter speed and a slow shutter speed is how much time elapses between the opening and closing of the shutter.
Many people have suggested that a better term for the concept of shutter speed would be “exposure time.” This is a much more accurate term as it clearly describes the amount of time that the image is exposed for.
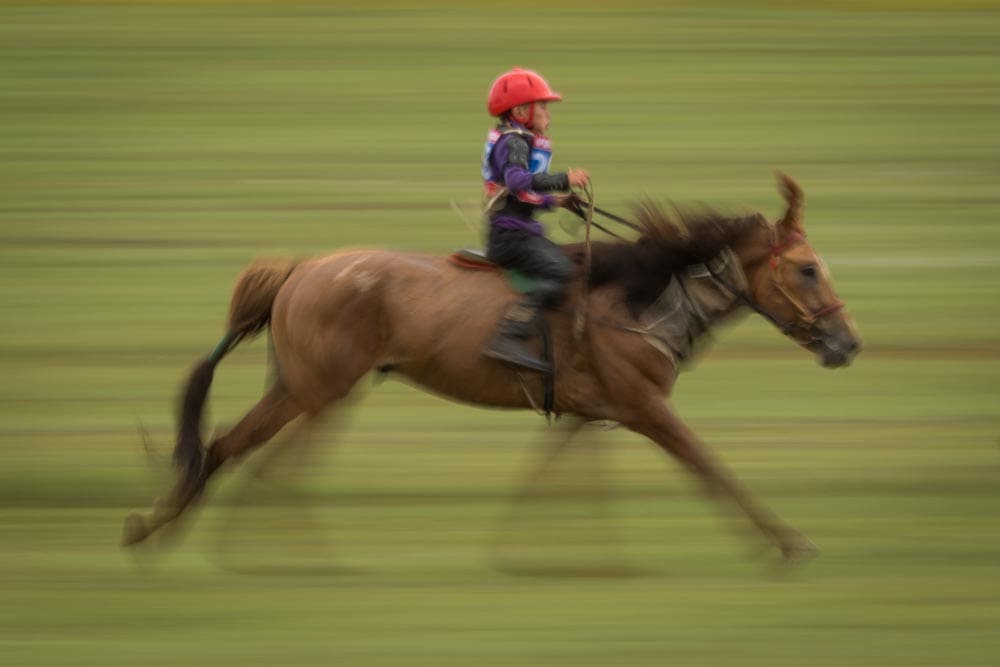
Canon 7D Mark II, EF 300mm f/2.8 + 1.4x III extender @ 420mm | 1/15 sec | f/22 | ISO 100
A jockey races at a Naadam festival in Mongolia — 1/15 sec panning keeps horse and rider recognizable while the steppe dissolves into speed lines.
Why Shutter Speed Matters
Selecting a shutter speed can simultaneously serve two purposes: setting a correct exposure and rendering moving subjects with a desired look. Typically, photographers will try to freeze or blur a subject, but there are many permutations to the options. Achieving a proper exposure is key, but not the topic I want to explore here.
Fundamental to any basic discussion of photography is the effect of different shutter speeds on moving subjects. Stationary subjects are not affected, beyond exposure, by different shutter speeds, so long as the camera is not moving. Moving subjects, on the other hand, are greatly affected by the chosen shutter speed, and choosing the right or wrong one can significantly impact your image.
The “Best” Shutter Speed for Moving Subjects
It’s the photographer’s choice whether to freeze the motion of a subject or blur it. If you choose to blur the subject with a slow shutter speed, the best shutter speed will depend on the speed of the subject, the magnification of the subject, and the personal desires of the photographer. In short, there are a wide variety of “best” settings.
To stop the motion of a fast-moving subject, there is a much more definitive answer to the best shutter speed. The best shutter speed for stopping fast action is the slowest shutter speed that successfully freezes the moving subject.
Suppose that a shutter speed of 1/1000 second successfully stops the motion of a dancer. If you choose a shutter speed of 1/2000, there is nothing better about that image. By using an overly fast shutter speed that allows half as much light into the camera, you will need to compensate by opening the aperture by 1-stop (which may not be possible) or raising the ISO a full-stop (which will increase noise). If this scenario was taking place under artificial lighting, you could theoretically increase the amount of light by 100% to compensate for the faster shutter speed, but this is usually not the case.
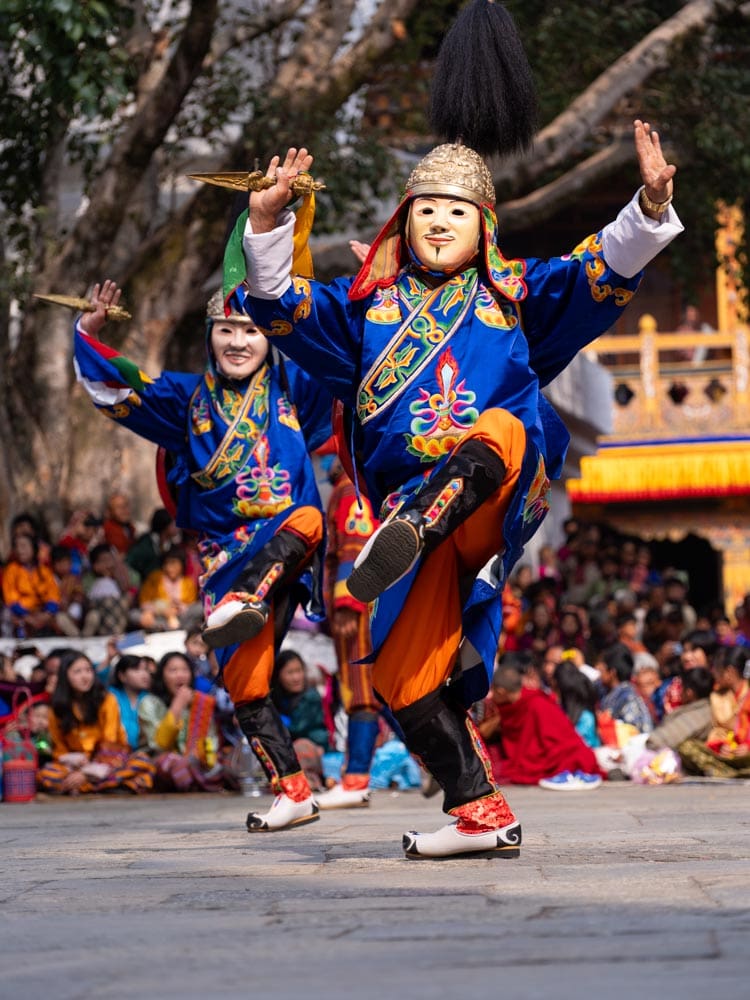
Fujifilm GFX100 II, GF 100-200mm R LM OIS WR f/5.6 @ 160mm | 1/1000 sec | f/5.6 | ISO 800
Dancers at the Paro Tshechu festival in Bhutan — 1/1000 sec was plenty to freeze this much motion from a distance.
Choosing an overly fast shutter speed almost always causes problems downstream. A key skill in photography is determining the slowest shutter speed you can use for a particular situation. The slower the speed, the more light you can let in, but if you go too slow you will blur your moving subject. It’s a delicate balance, but the right setting can be determined with a little experimentation.
Why “Recommended” Speeds Only Get You So Far
While I could, and will, recommend specific shutter speeds, be advised all of these come with a grain of salt. The speed of the subject is important, but so are other factors. Your point of view, where your subject is, the direction of travel, and the lens magnification are all factors in determining how effective a particular shutter speed is for a moving subject.
A shutter speed of 1/1000 sec for a dancer might be overkill for a wide-angle shot showing the entire stage, where the subject is but a minor scale element in the composition. That same 1/1000 sec might not be fast enough if framed tightly — always remember, speed is relative.
Freezing Fast-Moving Subjects
When I think of fast-moving subjects, I organize them into three categories: machines, animals, and humans. The most common fast-moving machine element that gets photographed is likely the airplane propeller. If you want to freeze a fast-moving prop, it may require the very fastest shutter speed available on your camera, 1/8000, and even that may not do the job. Side note: many airplane enthusiasts don’t like frozen props — it looks like the engine is stalled — so they instead aim for a little blur to show some motion.

Canon 5D Mark III, EF 300mm f/2.8 + 2x III extender | 1/8000 sec | f/5.6 | ISO 1600
At an airshow at Paine Field, Washington, even 1/8000 sec — the fastest shutter speed available — barely freezes a spinning propeller.
Be advised that many modern cameras can use mechanical or electronic shutters. Mechanical shutters usually top out at 1/8,000 sec, and electronic shutters can go as high as 1/180,000. Electronic shutters and their scanning effect are also something to take into consideration.
Fast-moving animals can vary from a charging elephant to the wings of a hummingbird. Generally speaking, larger objects are more difficult to move quickly, so there will be a wide difference between the best shutter speed for elephants and hummingbirds. For birds in flight, 1/2000 sec will work for many situations, but you may need to go a bit faster or can go a bit slower depending on the size of the bird and the nature of its motion. For larger animals you can get away with 1/60 to 1/250 of a second for casual movements and 1/500 to 1/1000 for faster action.
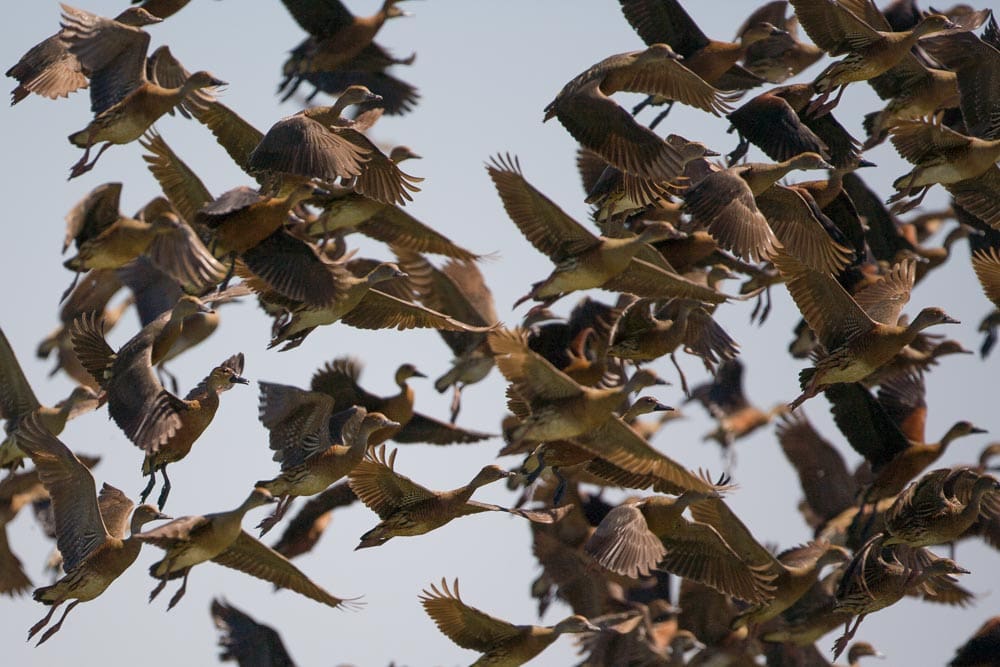
Canon EOS 5D, EF 500mm f/4 | 1/2000 sec | f/4 | ISO 100
At 1/2000 sec, every wingbeat in this flock is frozen sharp — even the flight feathers hold still.
With fast human action, 1/500 sec is my go-to setting. However, this is a general setting, and as you go up in athletic quality you’ll need to go up in shutter speed. The 1/500 sec might be good for a high school athlete, 1/1000 for a university level, and up to 1/2000 for a professional.
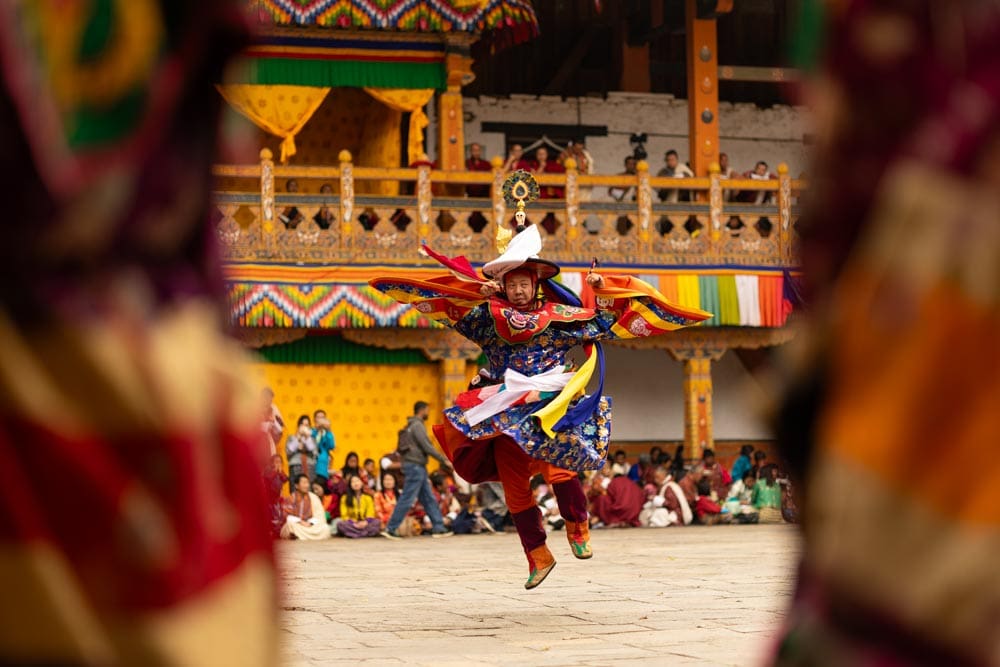
Canon R1, RF 85mm f/2 Macro IS STM | 1/500 sec | f/2.0 | ISO 50
a fast moving dancer at the paro tshechu festival is successfully frozen at 1/500 sec.
For casual human movement, like walking, people standing around, or people on the street, I like 1/60 sec. Once again this is relative — it will depend on subject speed, size, and direction of movement.
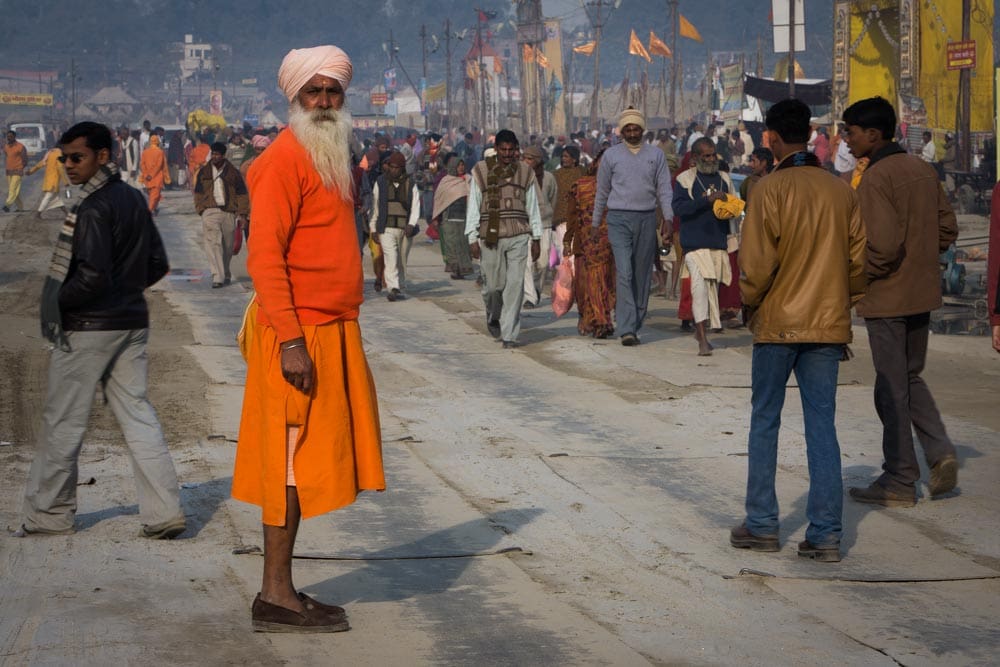
Canon 5D, EF 70-200mm f/2.8 L IS USM @ 120mm | 1/60 sec | f/16 | ISO 100
A pilgrim pauses on a busy street in Varanasi, India — 1/60 sec freezes casual foot traffic without needing a faster shutter.
Freezing Slow-Moving Subjects
Lots of things move slowly: clouds, boats, stars, and the line you’ve chosen at the grocery store. The correct shutter speed for these types of motion is highly variable. A bit of testing with different shutter speeds, plus close inspection with your camera’s magnification feature, will help you determine what’s best.
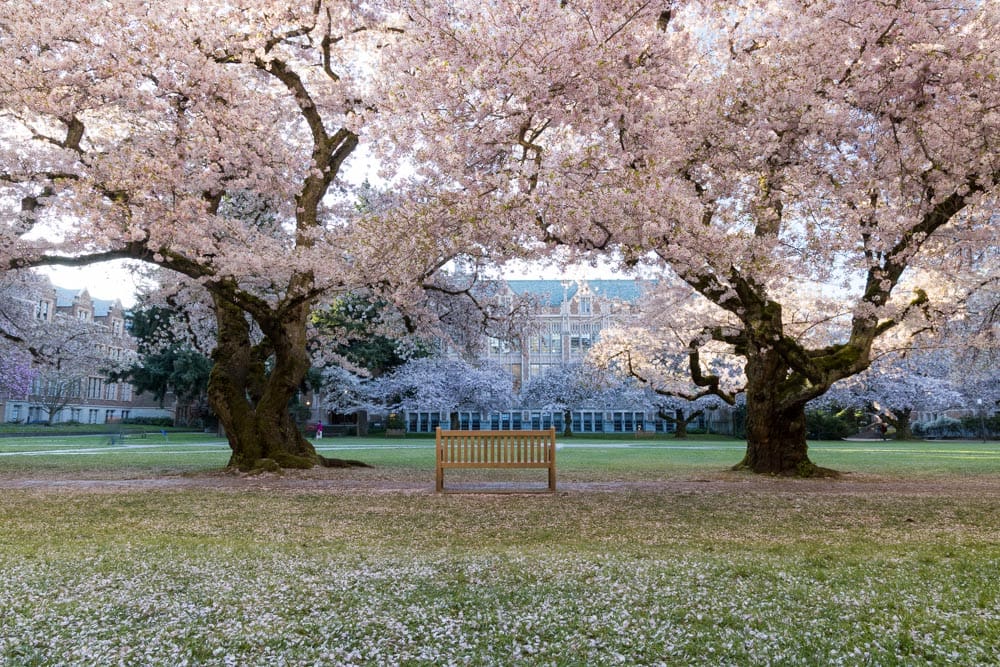
Canon R5, RF 24-105mm f/4 L IS USM @ 24mm | 1 sec | f/16 | ISO 100
The University of Washington’s cherry blossoms in full bloom — a gentle breeze barely registers at 1 sec.
For landscape-style images, a shutter speed of 1 sec is frequently acceptable, so long as there aren’t flowers or trees blowing in the wind. For astrophotography there is the 500/600 rule, where you take either 500 or 600 and divide it by your focal length to determine the maximum exposure time you can use before showing the motion of the stars. In short, you don’t want to use a shutter speed longer than about 8–30 sec if you want your stars to show up as point sources.
Blurring Fast-Moving Subjects
One of the oldest tricks in the photographic handbook is using a slow shutter speed to capture a fast-moving subject, resulting in a blurred version of that subject. While it’s a well-used technique, it remains highly effective for showing the relative speed of a subject.
For those fast-moving airplane propellers, after grabbing some frozen options, start adjusting your settings for slower shutter speeds. With each step down the shutter speed ladder, you’ll see less sharpness and more blur in the moving parts. After shooting through a range of options, choose the speed that looks best to you.
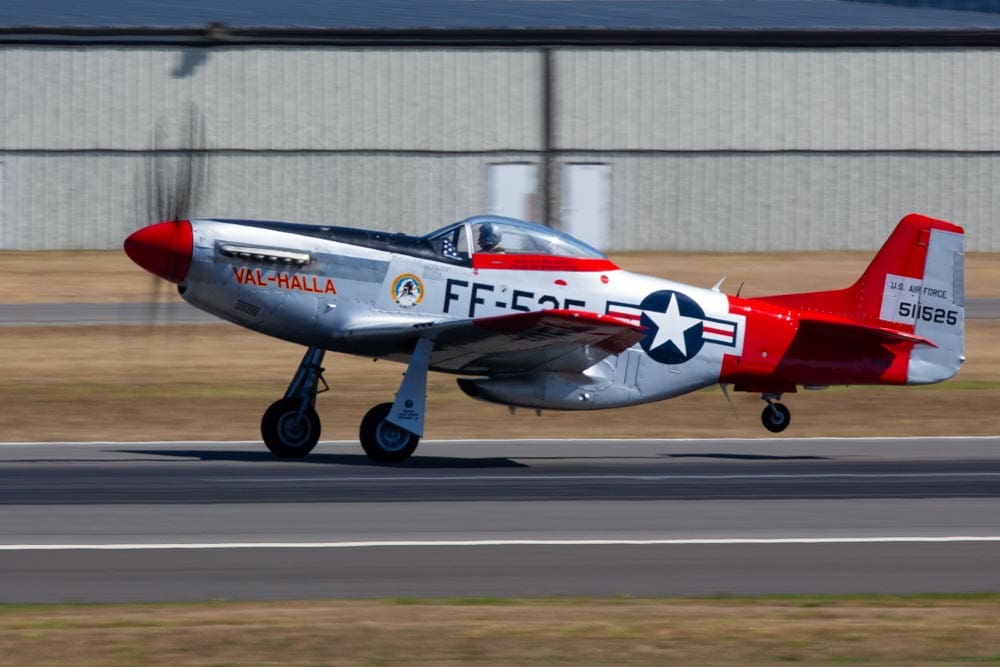
Canon 5D Mark III, EF 300mm f/2.8 L IS USM + 2x III extender | 1/125 sec | f/16 | ISO 320
Slowing to 1/125 sec at the same Paine Field airshow turns the propeller into a soft blur while the fuselage stays sharp.
This same test-and-examine technique will work for any type of subject. With time and experience, you’ll start to know what your favorite speeds are.
Panning: Sharp Subject, Blurred World
A key factor in shooting with a slow shutter speed is whether you’ll keep the camera stationary or move it to follow your subject’s motion — a.k.a. panning. If your subject is moving across the frame, panning lets you retain some sharpness on the moving subject while blurring the background and all non-moving elements.
Panning is a favorite technique of mine. What I love about it is that it highlights your subject and renders the rest of the scene in a soft blur that showcases the motion while still maintaining a hint of the environment.
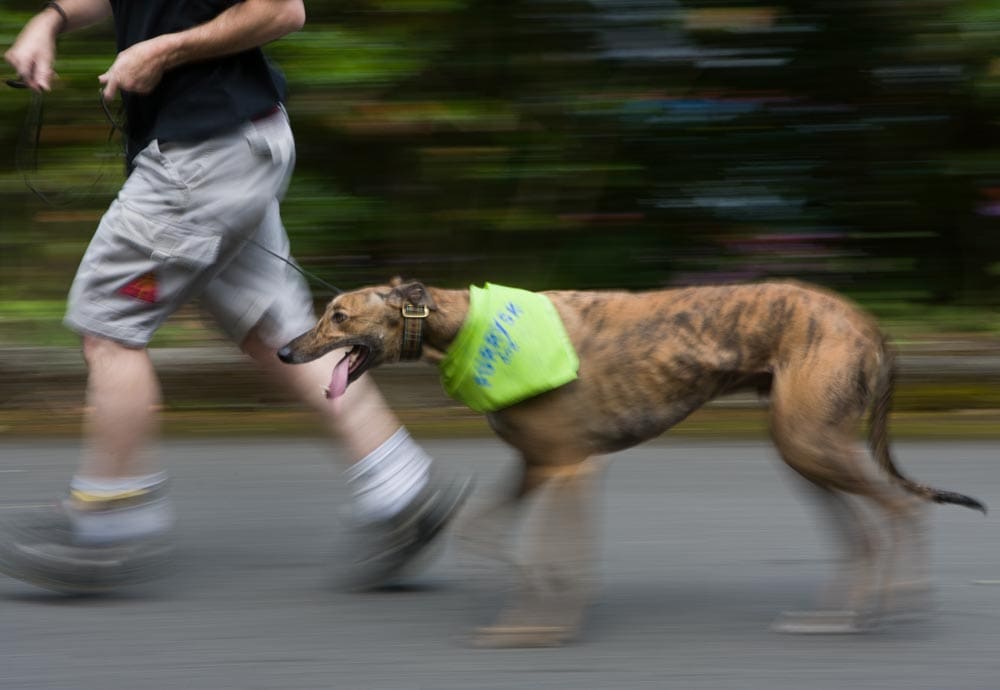
Canon EOS 5D, EF 70-200mm f/2.8 L IS USM @ 200mm | 1/15 sec | f/16 | ISO 100
1/15 sec panning keeps the dog and runner reasonably sharp while the background dissolves.
Choosing the right shutter speed for panning is a matter of balancing sharpness and blur. My usual panning goal is to achieve maximum blurriness in the background while retaining maximum sharpness in my moving subject. As you move from fast shutter speeds to slow, the balance shifts between subject and background.
I’ve found that for moving cars, bikes, and runners, 1/30 sec is a good starting point, but the fun really starts around 1/15 sec. I frequently try to work my way into even lower shutter speeds, but at a certain point the blur overwhelms the photo.
If you’re new to panning, be mindful that it’s more difficult than you might expect, and technique is everything. A good pan is when you keep your moving subject in the same spot within your frame for the entire length of your exposure. You need to become one with your subject and move in sync with their movements. Incorrect pans — where you’re moving too quickly, too slowly, or in a different direction — will result in a blurry subject. A good pan will result in a subject with clear areas of sharpness, or at least a subject that’s vastly sharper than its surroundings.
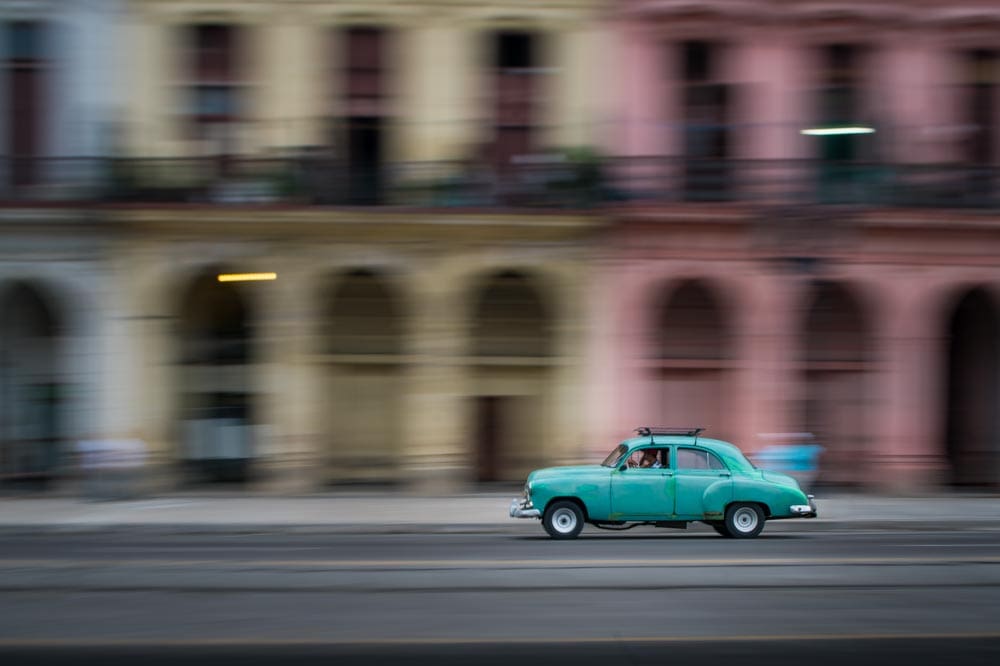
Sony A7R II, Canon TS-E 45mm f/2.8 | 1/8 sec | f/11 | ISO 200
A classic car cruises through Havana, Cuba — at 1/8 sec the car holds together while the pastel buildings dissolve into color streaks.
My advice is to start with a fast shutter speed and hone your framing technique for a series of shots. Then move down one stop — say, 1/30 to 1/15 — and continue honing your technique. Review your results and note what percentage of satisfactory images you’re getting.
For panning old cars in Havana, one of my favorite activities, I start off at 1/30 sec and get about a 40% keeper rate. However, 1/30 sec doesn’t result in a fantastic blur, so I’m keen to go to the next level. At 1/15 sec I get fewer keepers, maybe 20%, but the keepers are of greater quality — this is probably the sweet spot, but I like to keep going. Down at 1/8 sec my hit rate falls quickly to 10%, and at 1/4 sec it might be only 2%. You can keep going as far as you want — some may call it blurry, some will say it’s art, but when you’ve taken it too far, it’s going to be a mess.
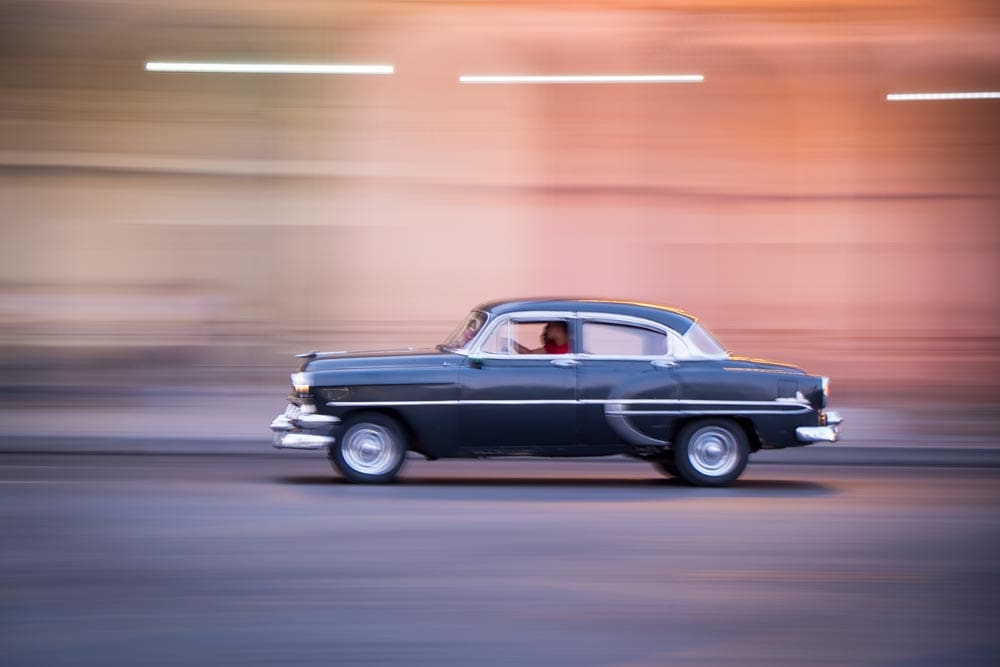
Fujifilm X-E2, XF 18-55mm f/2.8-4 R LM OIS @ 55mm | 1/4 sec | f/5.6 | ISO 400
Another Havana classic, pushed to 1/4 sec — the background streaks lengthen and the pan gets noticeably harder to nail.
I love 1/15 sec for panning — it works with a wide variety of subjects and strikes just the right balance of sharpness and blur. You may find a different shutter speed to be your favorite, depending on the speed of the subject, your technique, and your desired output.
Blurring Rivers and Waterfalls
Landscape photographers love sharpness from foreground to background, but when capturing a river or waterfall, it’s hard to resist getting a little creative with the look of the water. From a historical perspective, the blurry-water look may have started as an accidental result of necessary settings: a small aperture was needed to maintain sharpness from near to far, and a low-ISO film produced the finest detail. Those two settings, in turn, required a long shutter speed.
The fast-moving water captured with a long shutter speed results in a cotton-candy effect that resembles a misty fog. It’s not a very accurate way of recording what a landscape looks like to the eye, but it adds an element of mystery and can bring a wow factor to your image.
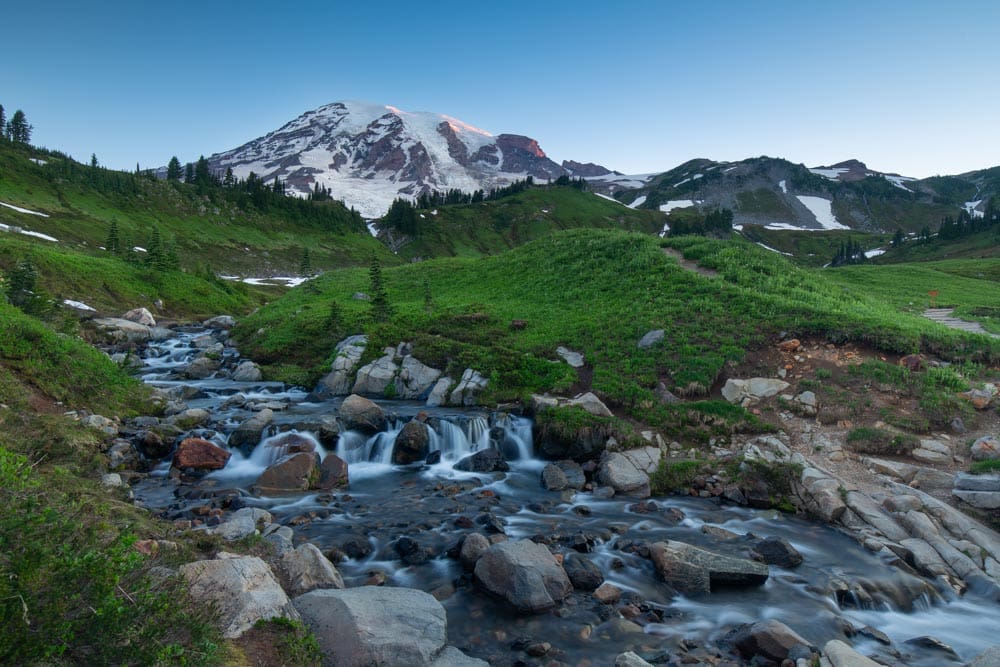
Canon 5D Mark III, EF 16-35mm f/4 L IS USM @ 21mm | 2.5 sec | f/11 | ISO 100
A 2.5 sec exposure at Mount Rainier turns the cascading stream into the classic silky-water effect.
In my courses on exposure, I always point out that one full second is a good standard for blurring moving water in a landscape-style image. The truth is you can get a nice-looking effect at 1/4 sec, but it gets better as you go longer. Using a neutral density filter, you can push that artistic look of the water by reaching for shutter speeds of 15 sec, 30 sec, and more.
Some folks don’t care for the blurry-water look — they might be tired of that old trick or believe that what you record should represent what you see with your eye. All’s fair in having opinions; if you like the look, go for it.
I’ve developed a theory about shutter speeds and waterfalls. Small waterfalls aren’t very impressive on their own, so using a slow shutter speed often adds an artistic element that brings a bit more life to the composition. Large waterfalls can be very impressive in their grandeur, and using a fast shutter speed to freeze the action will emphasize the power. If you want to highlight the elegance of a falls, go for a long shutter speed; if you want to draw attention to the force of the water, go for a shutter speed that freezes the motion.
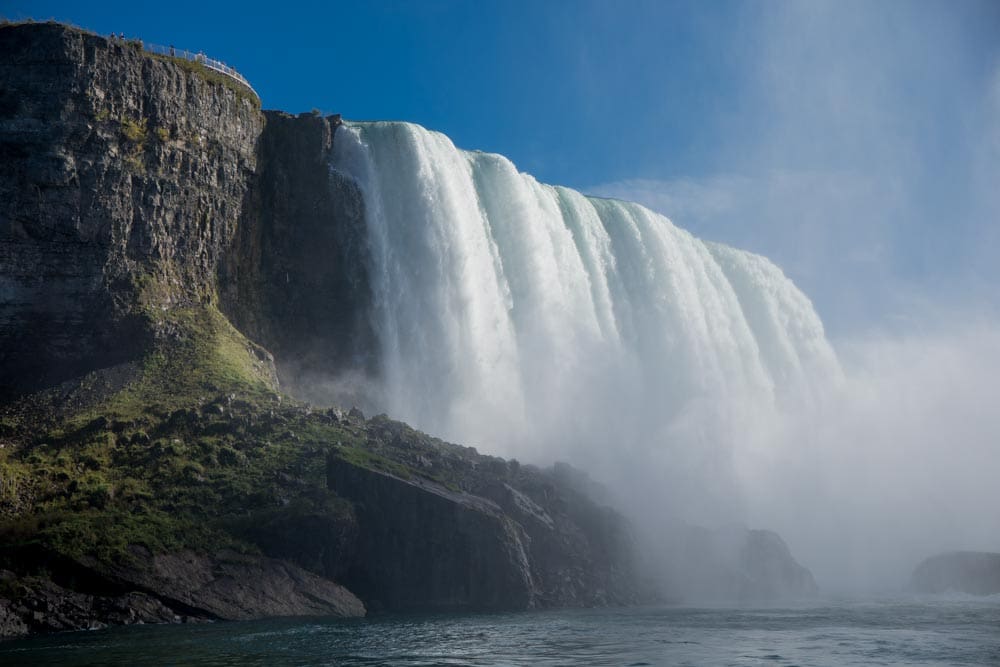
Canon 5D Mark IV, EF 24-70mm f/4 L IS USM @ 57mm | 1/1000 sec | f/5.6 | ISO 100
At 1/1000 sec, Niagara Falls reads as raw and powerful rather than soft and dreamy.
How Slow Can You Go Handheld?
The age-old rule for determining the slowest handholdable shutter speed is: 1 over the focal length. It’s a good one to remember, but there are several variables. This formula stipulates that if you’re working with a 60mm lens, you should use a shutter speed of 1/60 sec or faster to avoid blur from handholding the camera.
Some folks have a steadier grip and can go 1-stop better (1/30) or 2-stops better (1/15), while others may have a slight tremor and will need a faster shutter by 1-stop (1/125) or 2-stops (1/250). You’ll need to test yourself to see where you fall on this spectrum.
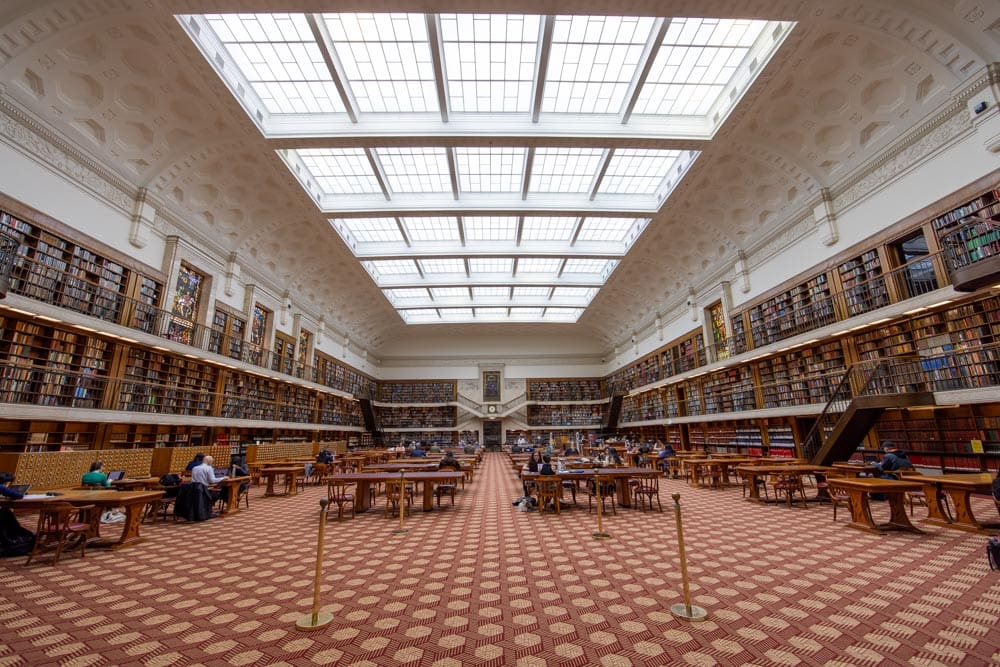
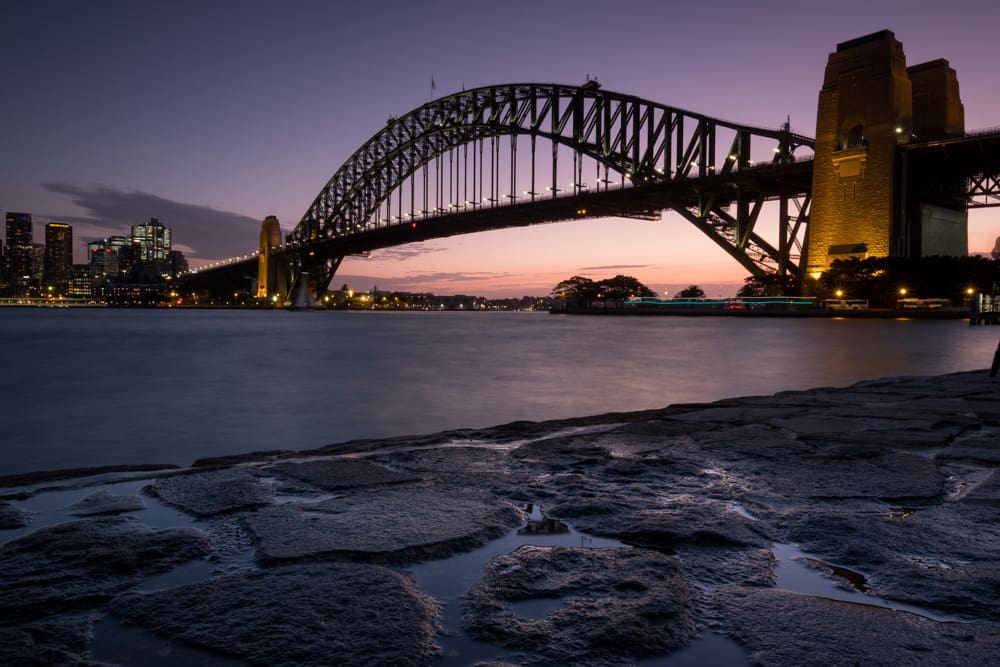
Canon R5, RF 14-35mm f/4 L IS USM @ 14mm | 1/30 sec (handheld) | f/5.6 | ISO 100
Handheld at 1/30 sec inside the State Library of New South Wales, Sydney — right at the edge of the handholding rule for this focal length.
Beating the Handholding Rule with Stabilization
Many cameras now feature some sort of stabilization, either in the camera body or in the attached lens. This can greatly enable your ability to achieve a sharp image at a slow shutter speed when handholding the camera. Be mindful that this technology does nothing to help you capture sharp images of fast-moving subjects.
Image stabilization allows you to go well beyond the “1 over the focal length” rule mentioned above. Manufacturers love to boast about how many stops of stabilization their system is good for, but you’ll need to test your own camera to really know how it performs for your needs.
Try photographing a bookshelf at progressively slower shutter speeds, both with your stabilization system on and with it turned off. With each step down the scale of shutter speeds, shoot several photos (3–5) to see how much variation you get at each setting. You can try this at different focal lengths, but I usually recommend starting at 50mm.
When I run a test like this, I usually find that without stabilization I get 100% sharp at 1/125 sec, 95% sharp at 1/60 sec, 80% sharp at 1/30 sec, and then — depending on how much sleep I’ve had or how fast my heart is beating — the slower shutter speeds can vary quite a bit. I might get a sharp image at 1/15 sec maybe 20% of the time, and at 1/8 or 1/4 sec I’m lucky to get 1 in 10 mostly sharp. Turning on image stabilization improves my results dramatically, though the improvement varies a bit depending on the gear I’m using.
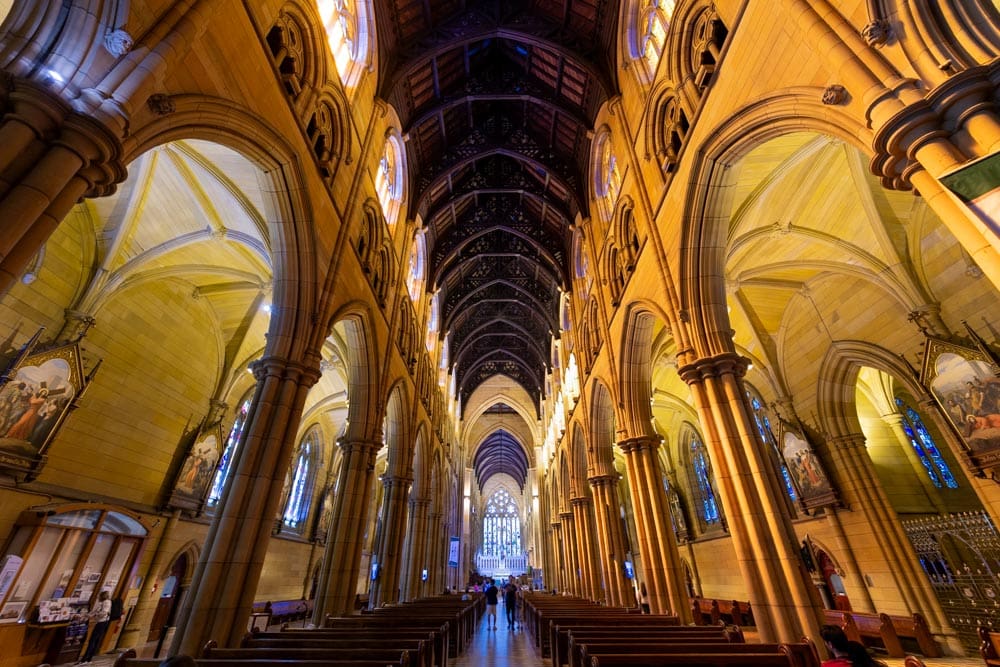
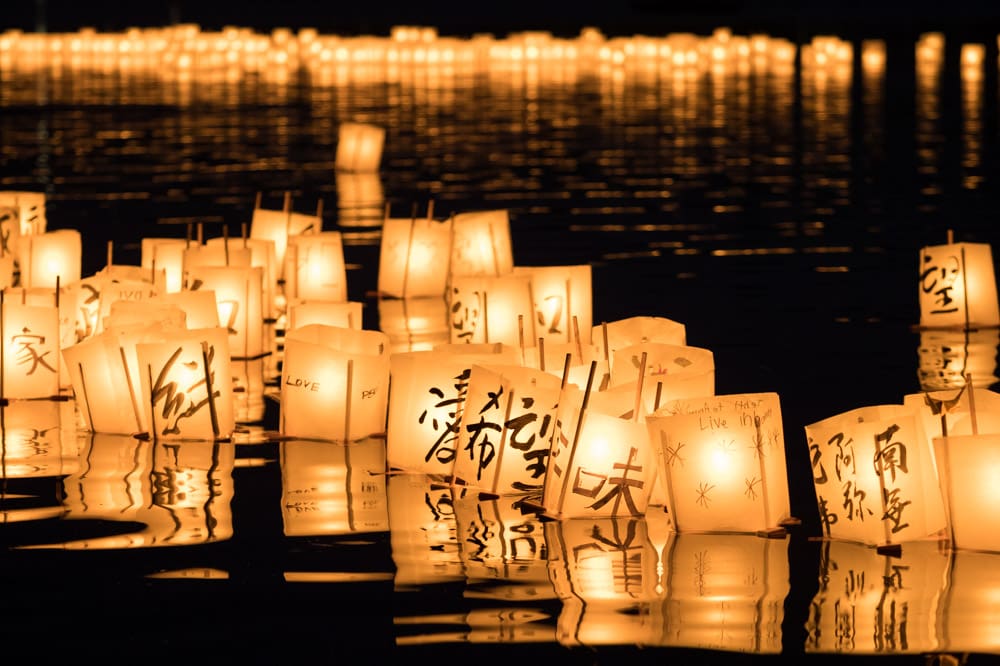
Canon R5 Mark II, RF 14-35mm f/4 L IS USM @14mm | 1/4 sec (handheld) | f/5.6 | ISO 800
Image stabilization made this handheld 1/4 sec shot possible in the dim light of St Mary’s Cathedral, Sydney.
Why Shutter Speed Comes First
I believe that shutter speed is frequently the most important setting for any photograph. Yes, there are many other important settings, but the shutter affects so much of what we capture, from exposure to the sense of motion. Being a master of shutter speed is a prerequisite to being a competent photographer.
The best way to learn is to shoot in manual exposure and pay attention to what shutter speed you set for every image. You’ll learn what speeds work for the subjects you shoot. When you encounter brand-new subjects, you’ll have an idea of what might work, but you’ll still need to do a little testing to confirm your instincts.
Shutter speeds have been a key part of photography from day one. The way the shutter is controlled has changed over time, but the significance of selecting the right shutter speed will always be one of the most important choices a photographer makes.
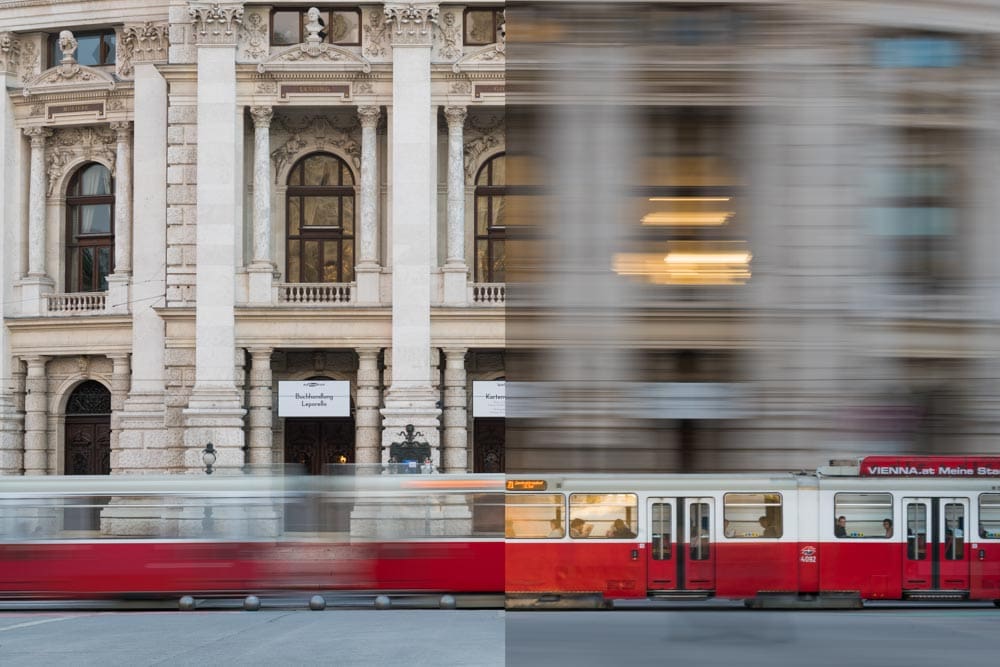
Sony A7R II, Canon EF 70-200 f/4 L IS USM
Left half: @ 100mm | 1/4 sec | f/11 | ISO 800 (Camera stationary)
Right half: @ 100mm | 1/4 sec | f/11 | ISO 800 (Camera panning)
Same 1/4 sec shutter speed on a Vienna street, two techniques: camera still on the left, panning with the tram on the right.
Make Time Your Creative Tool
If you take one thing away from this article, let it be this: shutter speed is never just an exposure setting — it’s a creative decision about how you want time itself to look in your photograph. Master it, and every other setting falls into place around it. Next time you’re out shooting, try dialing your shutter speed up and down on the same subject — you’ll be surprised how differently a single moment can feel.
Become part of John’s inner circle
Sign up for the newsletter here — it’s free.
Want to become a better photographer?
Check out John’s selection of photography and camera classes here.